Connecting to a Git server on your Windows machine
The past couple of days I’ve had the pleasure to start using a Git server as the new version control system at my customer. I’ve already had the pleasure to use GitHub and BitBucket in the past, which works like a charm with tools like GitHub for Windows and SourceTree. Because I’m used to using these tools, I really wanted to use them on my day job also.
Because we chose to use SSH keys as a validation mechanism I had to create one. Once you know how to do this it’s quite easy, but till 2 days ago I didn’t had a clue.
Lucky for me there’s a nice tutorial on how to create SSH keys on the GitHub help pages. Also Atlassian has provided an extensive help document with a couple of steps. In retrospect I think the Atlassian help page is the most useful for helping out with local Git servers. However, these help documents don’t take into account the usage of SourceTree and you will need to do some extra steps to get this working.
For future reference, I’ll describe the steps I had to take below.
First thing you want to do is install Git, the Git Extensions and if you haven’t already, SourceTree.
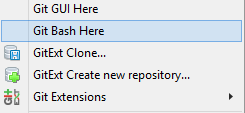
After doing so you can start Git Bash from the Windows context menu in Windows Explorer.
By default your SSH keys are stored in the ~/.ssh directory. For Windows users, the ~-sign means your home directory, so C:\Users\Jan\.ssh
To create a new SSH key you can type the following in Git Bash.
ssh-keygen -t rsa -C "[email protected]"
After running this command, the tool will ask you for a filename to save the SSH key in. I didn’t go with the default name because I thought it would probably be wise to use a different SSH key for every customer I’m working with. Also because I will probably use different e-mail addresses per customer. So I went for id_rsa_customer.
The tool will also prompt you for entering a passphrase. If you want to be secure, please do provide a passphrase over here. I didn’t (it also accepts blanks), because you have to provide this passphrase every time you want to do something with the server (pull, push) via the Git Bash. My solution might not be very secure, so I will not advise in doing the same.
Your new SSH private key will now be created in the .ssh folder on your system.
Now you have to add this new SSH key to the SSH Agent of your system. In Git Bash you can do this by executing the following command.
ssh-agent -s
ssh-add ~/.ssh/id_rsa_customer
This works some of the times, but not always. Next time I started Git Bash I received an error when adding the key to the SSH Agent, “Could not open a connection to your authentication agent.”
A Stack Overflow post helped me out here. If this also happens to you, you have to execute the following
eval `ssh-agent -s`
ssh-add ~/.ssh/id_rsa_customer
This will make sure the SSH agent is started. On the Stack Overflow post’s answer are a couple of links which provide some more in-depth detail about this issue.
Once you are done setting up your private key and the SSH agent, it’s time to get the public key which you will be able to add on your account on the Git server.
The public key is saved in a file on the same location as the private key, but has the extension .pub added to it. In my case it’s id_rsa_customer.pub. Copy this key to the clipboard like so:
clip < ~/.ssh/id_rsa.pub
Or open it in your favorite text editor and copy it from over there. Now add this key to your profile and you are set to start using Git via Git Bash.
Next time you’ll start Git Bash you will have to add the private key to the SSH agent again. This isn’t very user friendly and there’s also a way around this. The Atlassian help page (step 5) provides a script which can help you out.
Create (or modify) a .bashrc file in your user director (~/ or C:\Users\[username]\).
Add the following to the file via your favorite text editor.
SSH_ENV=$HOME/.ssh/environment
# start the ssh-agent
function start_agent {
    echo "Initializing new SSH agent..."
    # spawn ssh-agent
    /usr/bin/ssh-agent | sed 's/^echo/#echo/' > "${SSH_ENV}"
    echo succeeded
    chmod 600 "${SSH_ENV}"
    . "${SSH_ENV}" > /dev/null
    /usr/bin/ssh-add **~/.ssh/id_rsa_customer**
}

if [ -f "${SSH_ENV}" ]; then
     . "${SSH_ENV}" > /dev/null
     ps -ef | grep ${SSH_AGENT_PID} | grep ssh-agent$ > /dev/null || {
        start_agent;
    }
else
    start_agent;
fi
I don’t really understand everything which happens on this script, but I do know it automatically starts the SSH Agent and registers the provided SSH key when I’m starting Git Bash. If you want to ‘reset’ these settings, just delete the .ssh/environment file and this script will create it once again.
We still haven’t talked about SourceTree yet. That’s because I first wanted to have Git Bash set up to work properly.
The SSH key we have created with Git Bash doesn’t work with SourceTree out of the box, you’ll have to convert them first. Choose to import SSH Keys in the Tools menu option.
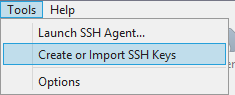
A PuTTY Key Generator screen will pop up.
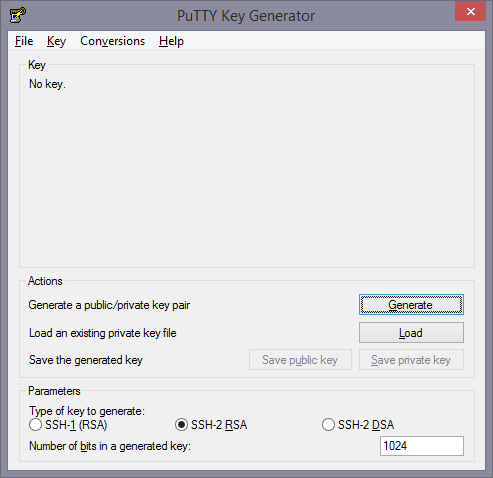
Load your existing private key into this and save it again with the Save private key button. Make sure not to overwrite the original file, because Git Bash still uses this one. Just save it to something like id_rsa_customer.ppk.
Now you are able to add this ppk SSH key to SourceTree.
In SourceTree you’ll have to start the SSH Agent before using SSH keys.
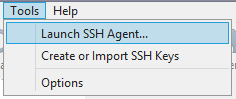
You’ll notice a small icon appears in your taskbar
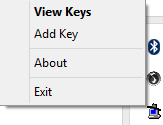
Press the View Keys option and a small window will appear. You will probably haven’t got any keys added, yet, so press the Add Key option and choose your newly created ppk key file.
If everything happened successfully, you are now able to connect to your Git server using Git Bash and SourceTree as well.
After closing down and starting SourceTree again, the SSH Agent is stopped and your key isn’t added automatically once you start it again. Lucky for us developers, Atlassian has added a nice option for us. By filling out the SSH Client Configuration in the Options screen you are able to automatically start the SSH Agent and load your default SSH key.

Now you are all set to start working with Git.